适合新手的Python练手项目:从爬虫到简易Web应用

专为Python初学者设计的实战练手项目,贯通Requests爬虫抓取、JSON结构化存储与Flask轻量Web展示,手把手带你跑通全栈开发最小闭环。
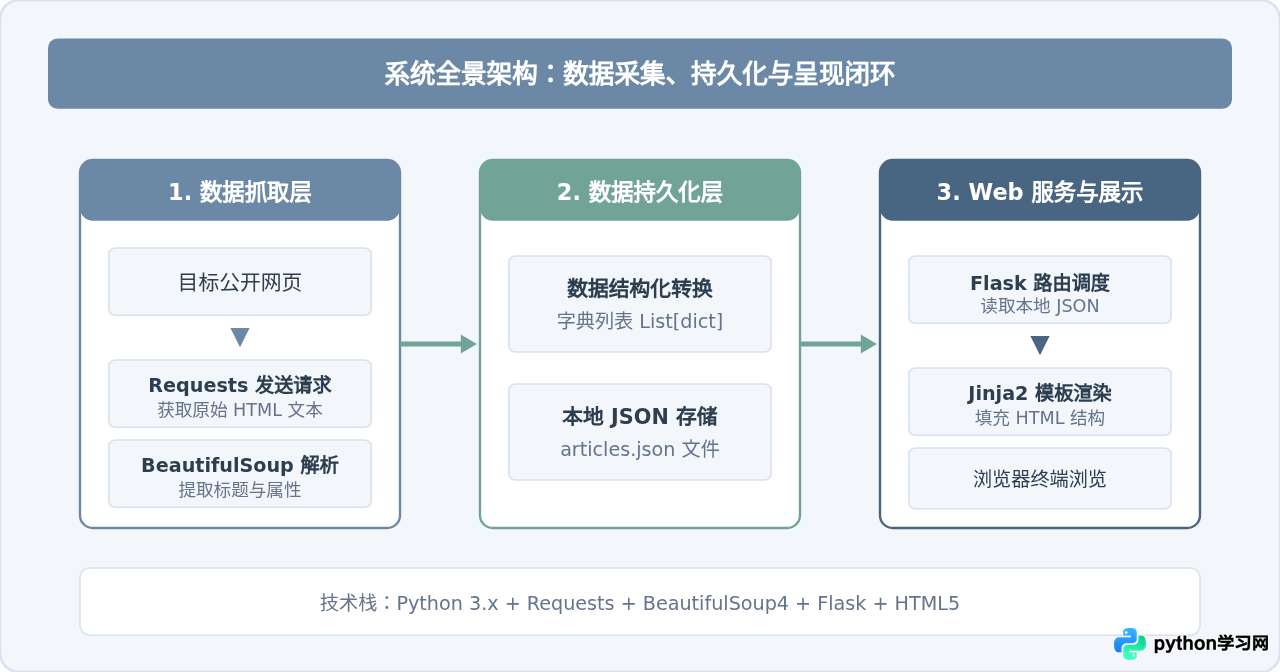
很多初学者在掌握了Python的语法基础后,常因不知如何组织完整程序而陷入“只会做练习题”的瓶颈。解决这一问题的有效路径,是完成一个涵盖“数据采集、本地持久化、网页展示”的小型闭环项目。本文通过引导读者编写一个针对公开测试页面的基础爬虫,并将抓取到的结构化数据接入Flask轻量Web框架呈现,帮助新手理解输入、处理与输出的完整应用逻辑。
一、准备工作与环境搭建
本项目无需复杂的生产级依赖,只需要两个常见的三方库:requests(用于发送网络请求)和 beautifulsoup4(用于解析HTML内容)。Web端则使用轻量级的 Flask 框架。
在你的工作目录打开终端或命令行,执行以下安装命令:
pip install requests beautifulsoup4 flask确认安装成功后,在工作目录下规划以下文件结构:
my_project/
│
├── spider.py          # 爬虫逻辑文件
├── app.py             # Web服务器文件
├── articles.json      # 抓取并存储的数据(运行spider.py后自动生成)
└── templates/
    └── index.html     # Web前端展示页面
二、阶段一:编写爬虫抓取目标数据
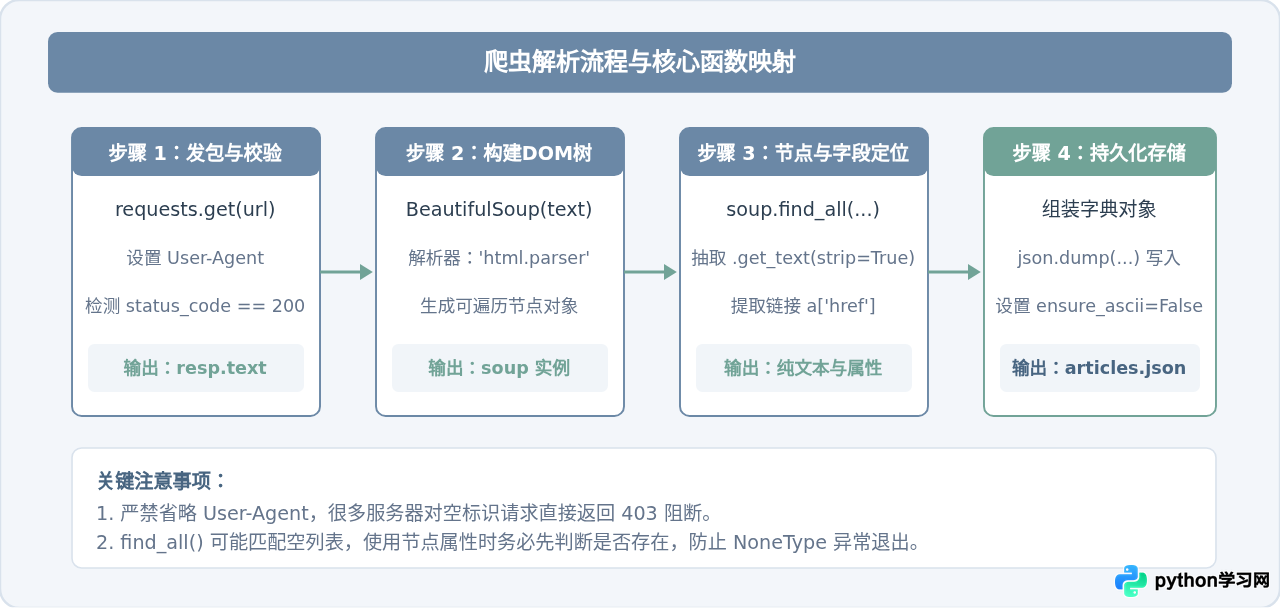
新手在学习网络爬虫时,应优先选用结构稳定、适合教学练习的静态页面(如公开练习站 http://quotes.toscrape.com 或带有明确DOM结构的公开文章列表)。静态网页的特点是数据直接包含在返回的HTML源码中,无须加载复杂的异步JavaScript脚本即可提取。
创建 spider.py
以下代码以 Quotes to Scrape 公开站点为例。代码会抓取页面中的名言文本、作者名称以及标签,并将这些条目保存为一个清晰的列表。
import json
import requests
from bs4 import BeautifulSoup

def fetch_quotes():
    target_url = "http://quotes.toscrape.com/"
    headers = {
        "User-Agent": "Mozilla/5.0 (Windows NT 10.0; Win64; x64) AppleWebKit/537.36 (KHTML, like Gecko) Chrome/120.0.0.0 Safari/537.36"
    }

    print("开始请求目标网页...")
    try:
        response = requests.get(target_url, headers=headers, timeout=10)
        response.raise_for_status()
    except requests.RequestException as err:
        print(f"网络请求失败:{err}")
        return []

    print("网页下载成功,开始解析节点...")
    soup = BeautifulSoup(response.text, "html.parser")

    quote_elements = soup.find_all("div", class_="quote")
    results = []

    for item in quote_elements:
        text_elem = item.find("span", class_="text")
        author_elem = item.find("small", class_="author")
        tag_elems = item.find_all("a", class_="tag")

        quote_text = text_elem.get_text(strip=True) if text_elem else ""
        author = author_elem.get_text(strip=True) if author_elem else "未知"
        tags = [tag.get_text(strip=True) for tag in tag_elems]

        if quote_text:
            results.append({
                "quote": quote_text,
                "author": author,
                "tags": tags
            })

    print(f"成功提取到 {len(results)} 条数据。")
    return results

def save_to_file(data, filename="articles.json"):
    with open(filename, "w", encoding="utf-8") as file_out:
        json.dump(data, file_out, ensure_ascii=False, indent=2)
    print(f"数据已成功写入 {filename}")

if __name__ == "__main__":
    quotes = fetch_quotes()
    if quotes:
        save_to_file(quotes)
在终端运行 python spider.py。命令完成后,当前目录下会生成 articles.json。你可以打开该文件查看生成的条目格式,确保字段内容整齐有效。
三、阶段二:用 Flask 构建轻量 Web 展示应用
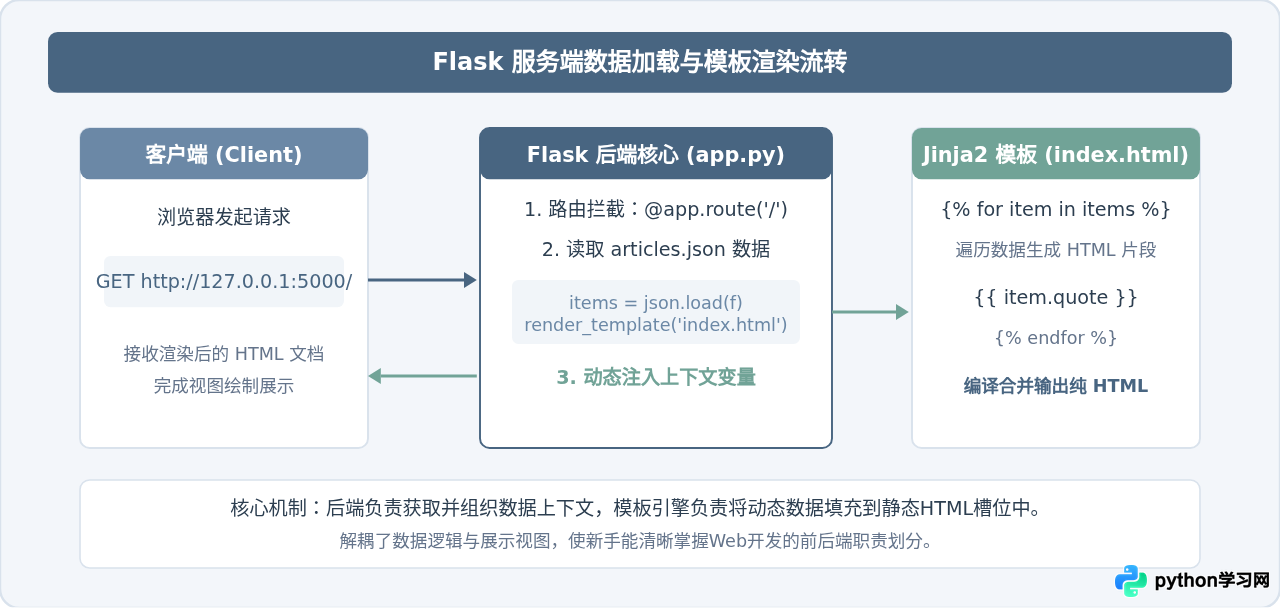
得到格式规整的 JSON 文件后,我们需要通过 Web 服务器将其呈现到网页上。对于新手而言,Django 往往显得体量过重、配置文件复杂;而 Flask 仅需几个简短的函数即可启动一个开发服务器,非常适合理解“路由、数据加载与模板渲染”的基本机制。
创建 app.py
在项目中编写 app.py,其核心任务有两个:定位本地的 articles.json 并解析成 Python 列表,随后调用 render_template 将数据传递给前端模板。
import os
import json
from flask import Flask, render_template

app = Flask(__name__)

def load_articles():
    file_path = os.path.join(os.path.dirname(__file__), "articles.json")
    if not os.path.exists(file_path):
        return []
    with open(file_path, "r", encoding="utf-8") as file_in:
        try:
            return json.load(file_in)
        except json.JSONDecodeError:
            return []

@app.route("/")
def index():
    articles = load_articles()
    return render_template("index.html", items=articles, total=len(articles))

if __name__ == "__main__":
    # debug=True 可以在修改代码时自动热重载,方便本地调试
    app.run(host="127.0.0.1", port=5000, debug=True)
创建 templates/index.html
在同级目录建立名为 templates 的文件夹,并在内部新建 index.html。Flask 默认会在这个目录中搜寻对应的模板文件:
<!DOCTYPE html>
<html lang="zh-CN">
<head>
    <meta charset="UTF-8">
    <meta name="viewport" content="width=device-width, initial-scale=1.0">
    <title>名言与资讯展示面板</title>
    <style>
        body { font-family: -apple-system, sans-serif; background: #F8FAFC; margin: 0; padding: 20px; }
        .wrapper { max-width: 800px; margin: 0 auto; }
        header { margin-bottom: 24px; border-bottom: 1px solid #E2E8F0; padding-bottom: 12px; }
        .card { background: white; border-radius: 8px; padding: 18px; margin-bottom: 14px; border: 1px solid #E2E8F0; }
        .content { font-size: 16px; color: #1E293B; margin-bottom: 10px; line-height: 1.5; }
        .meta { font-size: 13px; color: #64748B; display: flex; justify-content: space-between; align-items: center; }
        .tag { background: #EDF2F7; color: #486581; padding: 2px 8px; border-radius: 4px; font-size: 12px; margin-right: 4px; }
    </style>
</head>
<body>
    <div class="wrapper">
        <header>
            <h1>抓取数据汇总展示</h1>
            <p>当前共载入 <strong>{{ total }}</strong> 条记录</p>
        </header>
        <main>
            {% for item in items %}
            <div class="card">
                <div class="content">“{{ item.quote }}”</div>
                <div class="meta">
                    <span class="author">作者:{{ item.author }}</span>
                    <div class="tags">
                        {% for tag in item.tags %}
                        <span class="tag">#{{ tag }}</span>
                        {% endfor %}
                    </div>
                </div>
            </div>
            {% else %}
            <p>暂无抓取数据,请先运行爬虫脚本产生 articles.json。</p>
            {% endfor %}
        </main>
    </div>
</body>
</html>
在终端执行 python app.py。终端将打印类似 Running on http://127.0.0.1:5000 的输出。使用浏览器访问该地址,即可看到由爬虫抓取并由 Flask 呈现的页面。
四、常见开发问题与排查方法
在这个最小闭环项目的开发过程中,初学者通常会遇到以下几类常见报错与逻辑问题:
不要在
app.py 中使用相对路径 open("articles.json"),因为相对路径依赖于终端执行命令时所在的当前工作目录。推荐使用 os.path.join(os.path.dirname(__file__), "articles.json") 锁定脚本同级目录。
当目标网页个别节点结构不一致或缺少某个标签时,
soup.find() 会返回 None。提取属性前务必使用三元表达式做空值判断(如 elem.get_text() if elem else ""),防止程序异常退出。
使用
json.dump() 存储中文数据时,需显式声明两个参数:open(..., encoding="utf-8") 以及 json.dump(..., ensure_ascii=False)。
五、进阶练习与架构扩展
跑通了这个单次抓取与静态呈现的小项目之后,你已经掌握了 Python 基础的数据流转机制。接下来可以根据自身学习进度,选择以下四个方向进一步提升工程能力:
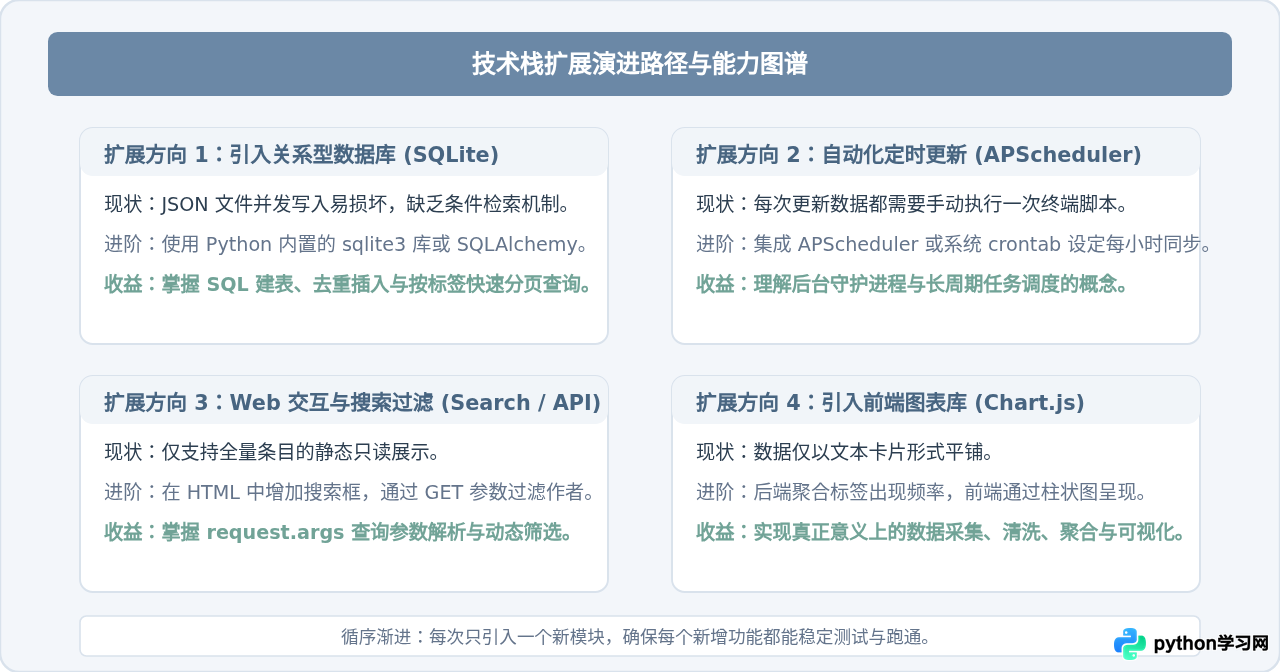
通过这个项目,读者不仅能体会到数据在网络、本地文件与 Web 框架之间的完整流动过程,还能建立起模块化编程的思维。遇到新的业务需求时,也能自然地将其拆解为抓取、存储与展示各个独立环节逐步实现。
免责声明:本文内容仅供参考,不代表本站观点。转载或引用请注明出处。