怎么用Python开发Discord机器人:discord.py框架代码指南

详解如何使用Python和discord.py 2.x框架开发Discord机器人,涵盖开发者后台配置、Privileged Intents权限说明、前缀命令与斜杠命令代码实现、Cogs模块化组织及常见报错排查。
使用Python开发Discord机器人,核心路径是在Discord开发者后台创建机器人账号并获取令牌(Token),接着在本地利用 discord.py 框架编写异步事件监听与命令响应代码。本文将从后台权限配置、基础会话建立、前缀命令与斜杠命令(Slash Commands)的代码实现,一直讲到多文件模块化(Cogs)管理与常见错误排查,提供可直接运行的完整代码模板。
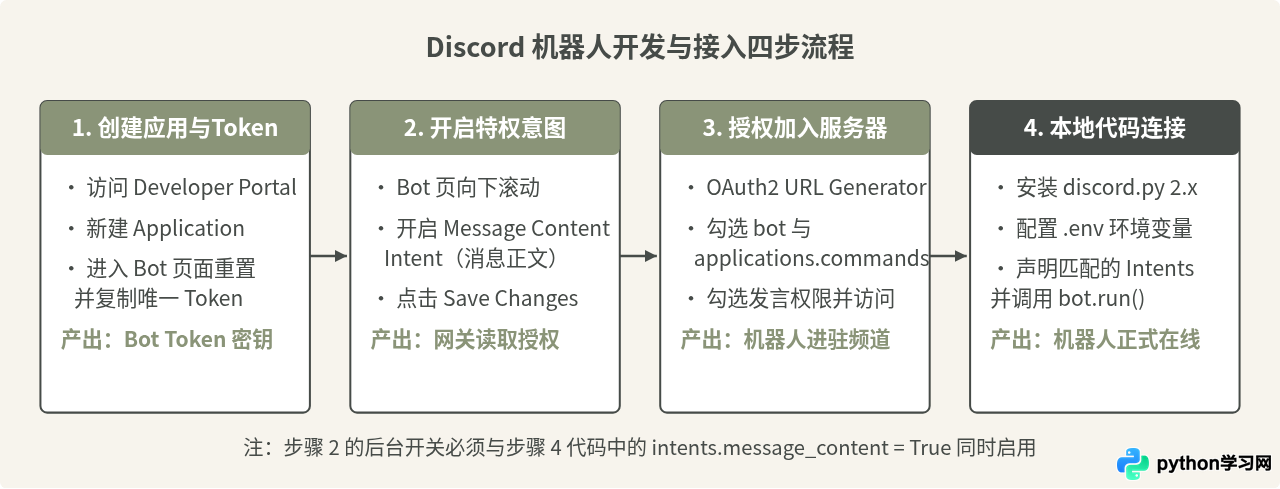
一、在Discord开发者后台创建机器人并获取Token
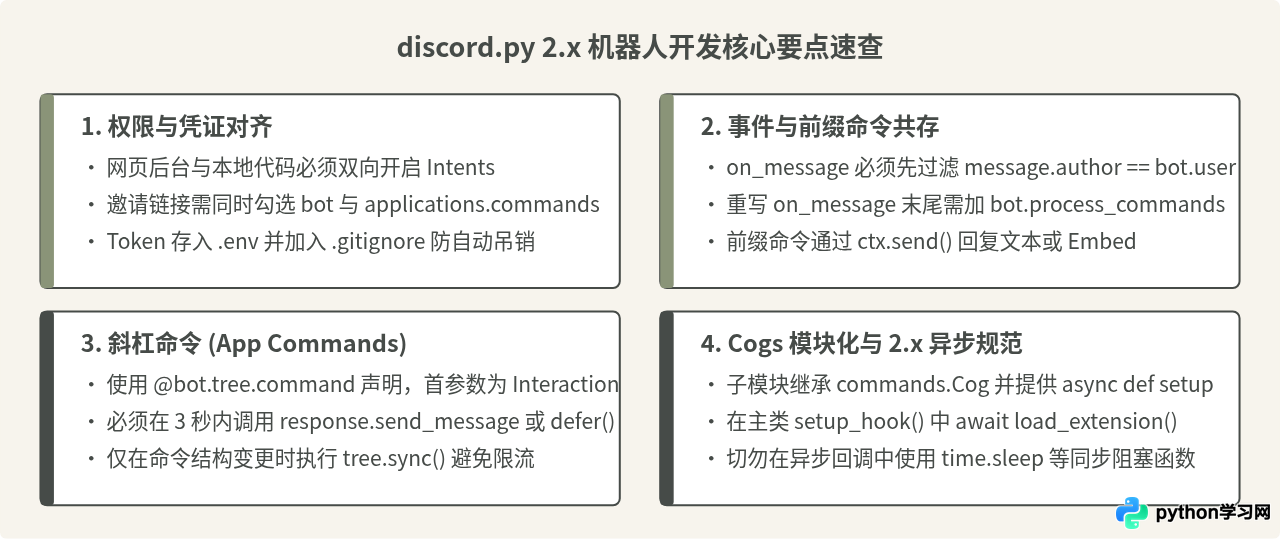
编写Python代码之前,需要先在Discord官方后台注册一个应用程序,并为它开启机器人身份与消息读取权限。代码中的 discord.py 只负责与服务器通信,账号凭证与基础权限开关必须在网页后台完成。
- 新建应用程序:使用浏览器登录 Discord Developer Portal(开发者门户),点击右上角的 New Application,输入应用名称(例如
MyStudyBot)并确认创建。 - 生成并保存Bot Token:在左侧菜单点击 Bot 选项卡,找到 Reset Token 按钮并点击。系统生成的长字符串即为机器人的登录凭证。请立即复制并保存在本地安全位置,关闭页面后将无法再次查看明文。
- 开启特权网关意图(Privileged Gateway Intents):同样在 Bot 页面向下滚动,找到 Privileged Gateway Intents 区域。将 Message Content Intent(读取消息正文权限)开关设为开启状态,随后点击页面底部的 Save Changes。如果需要监听成员加入或状态变化,可同时开启 Server Members Intent。
- 生成邀请链接并拉入服务器:点击左侧菜单的 OAuth2 → URL Generator。在 Scopes 列表中勾选
bot和applications.commands;下方随即出现 Bot Permissions 列表,开发测试阶段可勾选Send Messages、Read Message History和Use Slash Commands。复制页面底部生成的URL,在浏览器中打开并选择你有管理权限的Discord服务器完成授权。
二、准备本地Python环境与目录结构
discord.py 2.x 版本要求 Python 版本在 3.8 及以上。为了避免依赖冲突,并防止将敏感的 Bot Token 硬编码到源码中造成泄露,建议在项目根目录下创建虚拟环境,并同时安装 python-dotenv 用于读取环境变量。
在终端中创建项目文件夹 my_discord_bot,并执行以下命令完成虚拟环境初始化与依赖安装:
mkdir my_discord_bot
cd my_discord_bot
python3 -m venv venv
source venv/bin/activate  # Windows CMD 请使用 venv\Scripts\activate
pip install -U discord.py python-dotenv
安装完成后,在 my_discord_bot 目录下新建一个名为 .env 的纯文本文件,将刚才在后台复制的 Token 填入其中(不要加引号):
DISCORD_TOKEN=你的机器人Token字符串.env 写入 .gitignore 文件。一旦将包含有效 Token 的代码推送到公开的 GitHub 仓库,Discord 的安全扫描机制会在数秒内自动吊销该 Token,导致机器人离线。
三、编写第一个可运行的机器人代码
在 discord.py 中,开发交互式机器人最常用的是 discord.ext.commands.Bot 类。它是基础客户端 discord.Client 的扩展子类,除了能够监听底层网关事件,还内置了命令解析器。
在项目根目录创建 bot.py 文件,写入以下完整代码:
import os
import discord
from discord.ext import commands
from dotenv import load_dotenv

# 加载同目录下的 .env 文件
load_dotenv()
TOKEN = os.getenv("DISCORD_TOKEN")

# 1. 配置网关意图 (Intents)
intents = discord.Intents.default()
intents.message_content = True  # 允许读取普通消息正文

# 2. 实例化 Bot,设置命令前缀为感叹号 !
bot = commands.Bot(command_prefix="!", intents=intents)

# 3. 监听机器人启动完成事件
@bot.event
async def on_ready():
    print(f"已成功登录:{bot.user} (ID: {bot.user.id})")
    print("------")

# 4. 注册一个前缀命令 !ping
@bot.command(name="ping", help="测试机器人响应延迟")
async def ping_command(ctx: commands.Context):
    latency_ms = round(bot.latency * 1000)
    await ctx.send(f"Pong! 当前网关延迟:{latency_ms}ms")

# 5. 监听普通消息事件
@bot.event
async def on_message(message: discord.Message):
    # 忽略机器人自己发送的消息,防止死循环
    if message.author == bot.user:
        return

    if "你好机器人" in message.content:
        await message.channel.send(f"你好,{message.author.mention}!")

    # 显式交还控制权给命令解析器
    await bot.process_commands(message)

if __name__ == "__main__":
    if not TOKEN:
        raise ValueError("未找到 DISCORD_TOKEN,请检查 .env 文件配置。")
    bot.run(TOKEN)
在终端中运行 python3 bot.py,当连接建立后,终端会打印如下日志:
2026-11-04 19:15:03 INFO discord.gateway Shard ID None has connected to Gateway (Session ID: a1b2c3d4).
已成功登录:MyStudyBot#1234 (ID: 123456789012345678)
------
此时打开 Discord 客户端,进入机器人所在的服务器文字频道,发送 !ping,机器人会回复 Pong! 当前网关延迟:45ms;发送包含“你好机器人”的句子,机器人也会立即提及(@)你并问好。
关键概念辨析:为什么重写 on_message 会导致命令失效?
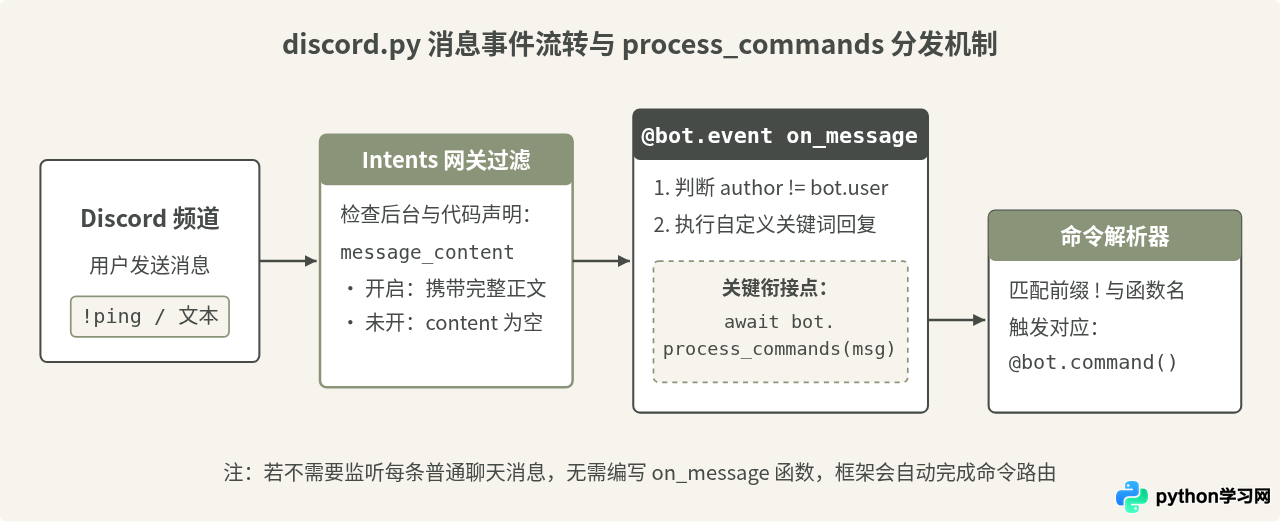
许多初次使用 discord.py 的开发者会遇到一个困惑:代码里明明同时写了 @bot.event async def on_message(message) 和 @bot.command(),为什么机器人只响应 on_message 里的关键词判断,而对 !ping 等命令完全没有反应?
这是因为 commands.Bot 内部原本就注册了一个默认的 on_message 监听器,用来检查每条新消息是否以 command_prefix(如 !)开头并触发对应命令。当你在自己的代码里定义 @bot.event async def on_message(message) 时,实际上覆盖(Override)了框架自带的默认监听器。因此,只要在自定义代码里重写了 on_message,就必须在函数末尾加上一句 await bot.process_commands(message),手动将消息传递给命令分发系统。
四、实现斜杠命令(Slash Commands)与卡片消息(Embed)
除了以感叹号开头的前缀命令,Discord目前更推荐使用原生的斜杠命令(Application Commands)。用户在输入框键入 / 时,客户端会自动弹出命令菜单、参数提示与类型校验。在 discord.py 2.x 中,斜杠命令通过 bot.tree(即 app_commands.CommandTree)进行管理。
1. 编写带参数的斜杠命令与Embed富文本
下面我们在代码中添加一个 /userinfo 斜杠命令,支持选择一个服务器成员(如果不选则默认为命令发起人),并以排好版的卡片消息(Embed)返回该成员的加入时间与头像信息。将 bot.py 更新为如下内容:
import os
from typing import Optional
import discord
from discord import app_commands
from discord.ext import commands
from dotenv import load_dotenv

load_dotenv()
TOKEN = os.getenv("DISCORD_TOKEN")

intents = discord.Intents.default()
intents.message_content = True

bot = commands.Bot(command_prefix="!", intents=intents)

@bot.event
async def on_ready():
    print(f"已登录:{bot.user}")
    try:
        # 将斜杠命令同步到 Discord 服务器
        synced = await bot.tree.sync()
        print(f"已同步 {len(synced)} 个斜杠命令")
    except Exception as e:
        print(f"同步斜杠命令失败:{e}")

# 定义斜杠命令 /userinfo
@bot.tree.command(name="userinfo", description="查看指定成员的账户与加入时间信息")
@app_commands.describe(member="要查询的服务器成员(留空则查询自己)")
async def userinfo_slash(interaction: discord.Interaction, member: Optional[discord.Member] = None):
    # 若未传入参数,则取当前触发交互的用户
    target = member or interaction.user

    # 创建 Embed 卡片对象
    embed = discord.Embed(
        title=f"成员档案:{target.display_name}",
        description=f"账户标识:`{target.name}`",
        color=discord.Color.from_rgb(138, 148, 120)
    )
    embed.set_thumbnail(url=target.display_avatar.url)
    embed.add_field(name="用户 ID", value=str(target.id), inline=False)
    embed.add_field(
        name="账号注册时间",
        value=target.created_at.strftime("%Y-%m-%d %H:%M"),
        inline=True
    )
    if isinstance(target, discord.Member) and target.joined_at:
        embed.add_field(
            name="加入本服时间",
            value=target.joined_at.strftime("%Y-%m-%d %H:%M"),
            inline=True
        )

    # 通过 interaction.response 发送回复
    await interaction.response.send_message(embed=embed)

# 定义仅自己可见的斜杠命令 /secret
@bot.tree.command(name="secret", description="获取一条仅自己可见的提示")
async def secret_slash(interaction: discord.Interaction):
    await interaction.response.send_message(
        "这是一条临时消息(Ephemeral),频道内的其他人看不到。",
        ephemeral=True
    )

if __name__ == "__main__":
    bot.run(TOKEN)
2. 前缀命令与斜杠命令的写法差异
在编写代码时,前缀命令与斜杠命令接收的第一个上下文对象不同,调用的回复方法也有明确区分:
| 对比维度 | 前缀命令 (Prefix Commands) | 斜杠命令 (Slash Commands) |
|---|---|---|
| 装饰器声明 | @bot.command(name="...") |
@bot.tree.command(name="...") |
| 首参数类型 | ctx: commands.Context |
interaction: discord.Interaction |
| 发送回复方法 | await ctx.send("内容") |
await interaction.response.send_message("内容") |
| 超时与延迟处理 | 无3秒硬性限制,可随时发送 | 必须在3秒内响应;耗时任务需先调用 await interaction.response.defer(),再通过 followup.send() 发送 |
| 网关权限依赖 | 必须开启 message_content 意图 |
无需开启 message_content,由Discord直接推送交互载荷 |
易混淆说法辨析:每次启动机器人都应该在 on_ready 中执行 tree.sync() 吗?
不少入门示例为了演示方便,都会把 await bot.tree.sync() 放在 on_ready 事件中。这种做法在刚创建第一个斜杠命令时确实能直接生效,但它存在两个常被忽略的前提限制:
- 重连触发限制:
on_ready并非只在程序启动时运行一次。当网络波动导致机器人断线重连时,on_ready会被再次触发。如果代码頻繁重启或重连,持续调用全局tree.sync()很容易触发 Discord API 的每日命令创建速率限制(Rate Limit)。 - 全局同步延迟:不带参数的
bot.tree.sync()是全局同步(Global Sync),Discord 官方对全局命令列表的缓存刷新时间最长可达1小时;只有指定具体服务器ID的单服同步await bot.tree.sync(guild=discord.Object(id=服务器ID))才会秒级生效。
更稳妥的做法是:日常修改命令逻辑(不改动命令名称、描述或参数签名)时,完全不需要重新执行 sync()。只有新增、删除斜杠命令或修改了参数定义时,才通过一个专门的管理员前缀命令(例如只允许开发者自己执行的 !sync)按需触发同步。
五、使用Cogs实现多文件模块化管理
当机器人的命令超过十几个时,把所有函数堆在单个 bot.py 文件中会导致代码难以维护。discord.py 提供了 Cogs(齿轮/组件) 机制,允许将不同功能领域(如管理功能、娱乐查询、定时任务)的命令和事件拆分到独立的 Python 文件中,还支持在不重启机器人的情况下热重载某个模块。
规划如下的标准模块化项目结构:
my_discord_bot/
├── .env
├── main.py          # 机器人启动入口,负责加载 Cogs
└── cogs/
    └── general.py   # 通用命令模块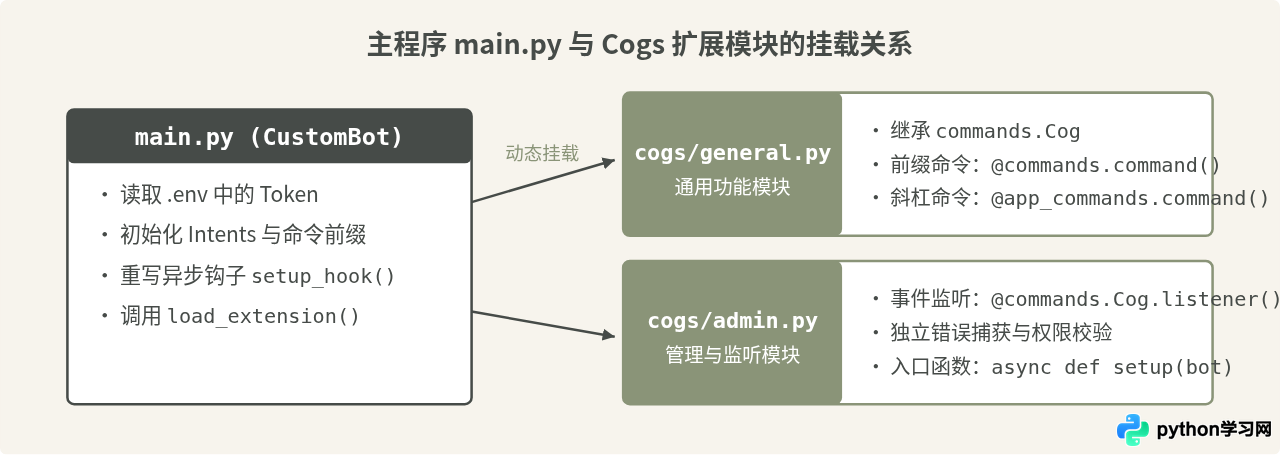
1. 编写子模块 cogs/general.py
在 cogs 文件夹下新建 general.py。在 Cog 类内部,前缀命令使用 @commands.command() 装饰,事件监听使用 @commands.Cog.listener() 装饰,文件末尾必须提供一个异步的 setup(bot) 函数供主程序调用:
import discord
from discord import app_commands
from discord.ext import commands

class GeneralCog(commands.Cog):
    def __init__(self, bot: commands.Bot):
        self.bot = bot

    # Cog 内部的事件监听写法
    @commands.Cog.listener()
    async def on_member_join(self, member: discord.Member):
        print(f"新成员加入:{member.name}")

    # Cog 内部的前缀命令写法
    @commands.command(name="hello")
    async def hello_cmd(self, ctx: commands.Context):
        await ctx.send(f"你好 {ctx.author.display_name},这是来自 GeneralCog 模块的回复!")

    # Cog 内部的斜杠命令写法
    @app_commands.command(name="calc", description="计算两个整数相加的结果")
    async def calc_slash(self, interaction: discord.Interaction, a: int, b: int):
        await interaction.response.send_message(f"计算结果:`{a} + {b} = {a + b}`")

# 必须包含的异步挂载入口函数
async def setup(bot: commands.Bot):
    await bot.add_cog(GeneralCog(bot))
2. 编写主入口文件 main.py
在 discord.py 2.x 中,加载扩展模块应当是异步操作。推荐通过继承 commands.Bot 并重写 setup_hook 方法,在机器人登录成功后、正式连接网关前自动遍历加载 cogs 目录下的所有模块:
import os
import discord
from discord.ext import commands
from dotenv import load_dotenv

load_dotenv()
TOKEN = os.getenv("DISCORD_TOKEN")

class MyBot(commands.Bot):
    def __init__(self):
        intents = discord.Intents.default()
        intents.message_content = True
        intents.members = True  # 对应 on_member_join 所需权限
        super().__init__(command_prefix="!", intents=intents)

    async def setup_hook(self):
        # 自动加载 cogs 目录下的所有 .py 文件
        for filename in os.listdir("./cogs"):
            if filename.endswith(".py") and not filename.startswith("_"):
                ext_name = f"cogs.{filename[:-3]}"
                await self.load_extension(ext_name)
                print(f"已加载扩展模块:{ext_name}")

    async def on_ready(self):
        print(f"机器人已上线:{self.user} (ID: {self.user.id})")

if __name__ == "__main__":
    bot = MyBot()
bot.run(TOKEN)discord.py 1.x 中,bot.load_extension() 和 bot.add_cog() 是同步方法;而在 2.x 版本中,它们全部改为了协程(Coroutine),调用时必须在前面加上 await,否则会抛出 RuntimeWarning: coroutine 'BotBase.load_extension' was never awaited 且模块不会生效。
六、常见报错与故障排查
在本地开发和调试过程中,如果遇到报错或命令无响应,可以对照以下四种最典型的情况进行排查:
- 报错
discord.errors.PrivilegedIntentsRequired:说明代码中设置了intents.message_content = True或intents.members = True,但在 Discord Developer Portal 网页后台的 Bot 页面中,没有打开对应的 Privileged Gateway Intents 开关。回到网页后台勾选并点击 Save Changes 即可解决。 - 报错
discord.errors.LoginFailure: Improper token has been passed:传入的 Token 无效。请检查.env文件中是否不小心包含了多余的空格、引号,或者错把 Application 页面上的Client Secret当成了 Bot 页面上的Token。 - 斜杠命令输入
/时在客户端列表里看不到:首先确认邀请机器人进服时,OAuth2 链接勾选了applications.commands作用域;其次确认代码已经执行过一次await bot.tree.sync();如果刚刚执行完同步,在桌面端 Discord 按Ctrl + R(macOS 为Cmd + R)刷新客户端界面即可立即加载出新命令。 - macOS 环境下报错
ssl.SSLCertVerificationError: certificate verify failed:这是从 Python 官网安装包安装 Python 后未初始化系统根证书导致的。打开访达(Finder)进入/Applications/Python 3.x/目录,双击运行其中的Install Certificates.command脚本即可修复。
免责声明:本文内容仅供参考,不代表本站观点。转载或引用请注明出处。